Installing Exterior Trim on a 1969 Chevelle
It seems like we see this situation all the time: someone will see a restoration through to the point that the paintwork is complete, then progress grinds to a halt when it comes time to reattach all the trim. This is especially true of 50’s, 60’s, and 70’s cars that seem to have miles of chrome and stainless on them.
Speedway Motors employee Tyson Jurgens recently picked up a really nice ’69 SS 396 Chevelle that was in this very state. The car wore a shiny respray, but all the chrome, stainless, and marker lights were scattered around the trunk. Some were missing completely. So, he turned to the Speedway Motors Muscle Car catalog to seek out some replacements. Follow along below as he moves closer to a finished Chevelle by installing some weatherstripping and shiny stuff.
When it comes to trim or molding, one thing I think many people can agree on is it can make a car look incredible but it’s also terrifying to install or even hold. Personally, I’m afraid that I will drop it, press on it too hard, or even look at it the wrong way and something bad might happen. But I forced myself to get over it and got plenty of practice installing the trim on my ’69 Chevelle.
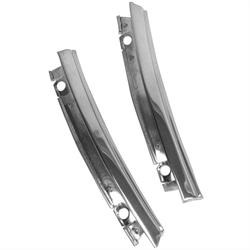
Hood Edge Trim
When I purchased my Chevelle it didn’t come with the rear hood edge molding on it. Speedway Motors was able to help me with this situation; part number 92612281 is the replacement hood edge molding for a 1968 – 1972 Chevelle and El Camino. Pictures don’t do justice to how nice the part really is.
The trim is made of a lightweight aluminum, so I took care not to bend the piece during installation. As you can see this piece looks no different than an original hood edge molding and even has the shine and fitment of an original part.
Installation is simple and straight forward but, I would recommend having one person on each side. You can do it alone, but it makes it is more difficult to line it up with the fender edge trim (part number 92612299). It's a very tight fit when you begin the install, so you will need to use a bit of force to get the trim to fully seat against the hood. Fortunately, I found this to be a high-quality part that did not bend or dent while being pressed into place.
This took me a few attempts, but once on it gave the hood a completely different look. (If my hood was also painted it would look even better, but that’s a project for another day!)
With the hood edge molding and the fender edge molding all lined up together I am one step closer to a complete car.
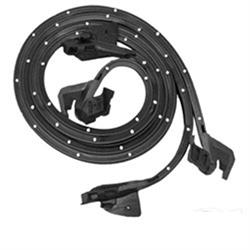
Door Seals
We all have things we love about old cars, and one weird thing for me is an older car with a proper sounding door that opens and closes properly. When I am looking at an old car and the door opens and closes just as well as any new vehicle, I know it has been done right.
The door seals on my Chevelle were less than good. They were cracked, broken, or completely missing in many places. If they got any drier, they probably would have just turned to dust. Thankfully Speedway Motors offers part number 92617410 which is a pair of replacement door seals for ’69-‘72 Chevelle.
These are just as good if not better than what came on the car 52 years ago. They are made of a high-quality rubber and have outer door clips built in. You will get the plastic clip to push the seal on each end of the door. It isn’t necessary but I added a little bit of weatherstripping adhesive to sandwich between the clip, gasket, and door.
These can be a little bit of a pain, but it was easier for me since my interior door panels were off. You will have to line the clip up with the hole and maybe stretch the seal a little, then use a bit of force to push the clip up through the holes in the door. The holes are embossed where the clips pushed in so I took a razor blade and made a cut so the clip will go through the seal. With the installation complete, I closed the doors and let the seal settle overnight. The next day I had an absolutely exquisite door seal and the doors open and close with a glorious sound that’s just as good if not better than newer vehicles.
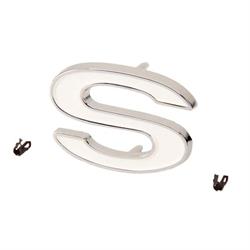
Fender Emblems
Emblems tell you what a car is and sometimes they also really make the car pop. I may be a bit partial, but my personal favorites are the emblems on the Chevelles. The fender emblem on a 1969 Chevelle SS 396 has got to be one of the coolest things ever. Unfortunately, when my car was painted 30 plus years ago the previous owner did not remove the original emblems properly and the studs were broken off.
These emblems can be removed properly with a little patience and time. If they are held on with the speed nut, you can just take a 3/16 ratchet and unscrew them. If they have the barrel clips, you can gently tap them out and not break them off. But since mine were improperly removed and broken, I was in a jam. Again, the Speedway Motors catalog came to the rescue with part number 92617770. This is a replacement “S” that goes on the fender of a 1969-72 Chevelle or El Camino, and the cast aluminum construction of the new emblems will make it hard for you to even tell them apart from the originals.
Each emblem comes with two-barrel clips. These clips make the job so much easier and can be used instead of the supplied speed nuts. You can simply press the barrel clips into the body and once they are seated properly, you can push your emblem into the clips. They will expand on the backside and hold the emblem securely.
You will have to put a little bit of force onto the emblems but once you have them pushed on you will be very pleased with the result. You can certainly use the speed nuts, but the barrel clips save time and make the install easier.
If you can look past the 30+ year-old paint job on my car, this small detail makes the car pop so much more. I love that GM used this design, letting everyone know how much of a monster it is.
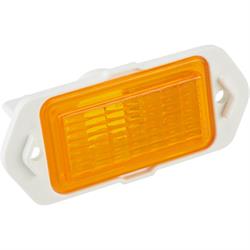
Side Marker Lights
My dad was the one who got me into cars, and I am thankful for everything he has taught and showed me. I always remember him saying how cool he thought the marker lights looked on his ’69 Chevelle back in the day. Seeing an old light through a lens is just cool to me and it has a certain nostalgia feel and look to it.
Mine were pitted and one of them was broken when they were thrown into the boxes of parts. Speedway offers part number 92615612, which is the replacement marker light bezel for a 1969 Chevelle and El Camino. You will need two of these (one for each side). They have an extremely nice polished finish to them. If you don’t have the side marker lights already those are part number 92611167 and to put it all together, I also purchased the installation nuts that are part number 92610625.
This is a simple install, the marker light will go inside of the fender, the bezel will go on the outside, and they will sandwich together. Obviously, you can use a ratchet or wrench on the speed nuts, but I like to use a nut-driver because it allows me a better feel of how tight the nuts are getting. Be careful not to overtighten these. Once the install is complete, the last piece to top it off is a pair of 7443NA bulbs from the local parts store.
Aluminum Hood Inserts
As the years have gone by, it seems like cars are not as cool. You can tell the attention to detail isn’t as apparent as it once was. This seems especially true of hoods; everything nowadays seems to be plain and flat and if it does have vents or scoops, they are usually fake.
But in 1969, the designers at Chevrolet must have been thinking about how to make the cars look cool and be functional. In my opinion, the design of the 1969 SS 396 Chevelle hood is one of the greatest As the years have gone by, it seems like cars are not as cool. You can tell the attention to detail isn’t as apparent as it once was. This seems especially true of hoods; everything nowadays seems to be plain and flat and if it does have vents or scoops, they are usually fake.ever. I love the dual functioning vents. And, all it took was ten simple speed nuts to get them added on to my car.
Speedway Motors offers part number 92620453, which is a set of aluminum hood inserts than have been dressed with a brilliant layer of chrome and include the ten-speed nuts that you will need to complete the installation. My original hood inserts were long gone after 53 years, and these were exactly what I was looking for.
The hood inserts have five pins that will go into the hood. I set the inserts into the holes and then started to screw the speed nuts on, but don’t tighten them down just yet. Once you have them snugged onto the pins you can start to tighten the nuts down. I was extra careful here, tightening the nuts down as if I was installing a car wheel. I moved in a diagonal pattern to make sure it would all end up even (and nothing would break). This install requires a long reach over the fender, so be careful to save your paint. A Speedway Motors fender cover 91089176 would be good here.
This install took no longer than five minutes, but it’s crazy how two pieces of aluminum can make a car look so great. This has always been one of my favorite parts of these cars and I am ecstatic that it’s finally on mine.
Tyson's Chevelle still isn't "done," but the addition of some brightwork and weatherstripping has made it something that he can drive around without any big holes where trim or lights are supposed to go. This can all seem like trivial stuff, but the details add up into car that looks like its designers intended.