How To Adjust, Install & Troubleshoot Throttle Cable & Kickdown Cables
Customizing your ride often creates unrealized issues that you must overcome to enjoy the fruits of your labor. One such issue that is often overlooked until the last minute is the throttle and kickdown cables. Even a simple carb swap can render the stock throttle linkage useless and could set back your progress. There are many options for throttle and kickdown cables, but they all operate on the same basic principle; push the go pedal, and the throttle opens. Getting them to fit and operate correctly does require a little forethought, however.
Watch the installation video above to see just how easy a cable-style throttle and transmission kickdown setup is to add to your ride.
Regardless of what make and model of vehicle you have, there will be either mechanical linkage or cable that connects the pedal to the throttle. Vehicles built before the late 1960s mostly used mechanical linkages, which require pivot brackets and heim joints. By the early 1970s, nearly every vehicle used cable linkages instead, which are much easier to work with, though even the stock cables can be troublesome with engine swaps and EFI conversions. Besides fitment, old cables can be stretched, sticky, too long/short, or simply lack the adjustability needed to work for your application.
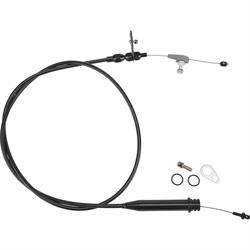
You can easily upgrade your stock throttle linkage to an aftermarket universal throttle cable kit (and kickdown for the auto trans) with Speedway Motors and Lokar. Lokar offers throttle cables for nearly every application you could need. The install featured here uses Lokar Hi-Tech stainless steel braided kits for both throttle and kickdown on Chevy 327 small block and TH350 in Corvette demo chassis. We built this chassis specifically to be used as a “test mule” for installing various parts without an annoying body being in the way so you can get a better picture of how the parts work and install.
What Does a Throttle Cable Do
A throttle cable serves as the link between your gas pedal and the throttle blade. As the driver presses or releases the gas pedal, the throttle cable controls the movement of the throttle plate, which then regulates the engine's speed. Unlike rigid mechanical linkages, a throttle cable provides flexibility in routing, allowing for easier adjustments. Changing pivot points or lever arms in hard linkages can alter the movement ratio, but this may result in unwanted driving characteristics, like inconsistent throttle response. In contrast, the throttle cable offers a more reliable and customizable connection, ensuring smooth and responsive acceleration.
Troubleshooting Broken Accelerator Cable or Stuck Throttle Cable
Problems with your throttle linkage can occur with factory or aftermarket components. The key is to ensure that they are correctly routed so that they can operate freely. A linkage or cable may come into close contact with the engine itself or the exhaust and then bind up when trying to re-route them. A stuck throttle while driving is an emergency situation that you really don’t want to experience.
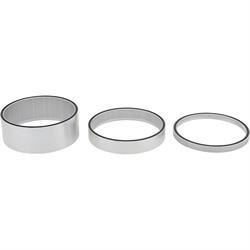
The throttle pedal and throttle blades should move together. There should be no play in the pedal before the throttle opens and the throttle should be wide open when the pedal is at its maximum travel. Mechanical linkages should be free and clear of any objects through their entire movement. Air cleaners are often the cause of carburetor linkage interference, in many cases an air cleaner spacer can be a simple solution.
Cables don’t have the same physical restraints, they can bend and flex around obstacles, making them the ideal link. Most cables use a plastic housing, even aftermarket braided cable housings have a nylon or plastic inner core for the cable to pass through. Heat is the biggest issue for a cable, as the inner lining can melt or deform, hindering throttle control. Even if the housing looks normal on the outside, the inside can swell from heat and bond to the cable. Always maintain a minimum of two inches from any source of significant heat and use thermal sleeves or exhaust wrap products in critical areas.
The other common issue for cables is sharp bends. While cables can certainly bend, there is a limit before the cable starts to get pinched in tight curves. Sweeping bends are always best, but sometimes they are unavoidable. If you do have to make a tight bend, make sure there is a length of straight cable before and after, so you don’t create multiple pinch points.
Throttle Cable Diagram & Installation Tips
Proper installation is key for achieving smooth, responsive acceleration and consistent performance. The diagram below from Lokar illustrates a standard cable mounting bracket assembly.
Installation Tips:
- Minimize bends to prevent binding
- Maintain 2” clearance from heat sources
- Ensure full pedal travel—no slack at idle, WOT at full depression
- Use an air cleaner spacer if interference occurs
Can You Shorten a Throttle Cable or Kickdown Cable
Installing and adjusting these cables is easy, you just need a little patience and planning. No special tools are needed, however a chop saw is recommended for cutting stainless steel cable housings, as the strands will fray and can cause difficulty upon reassembly. A Hi-Tech Lokar kickdown cable has a special ferrule that slides behind the cut and then gets slid back over the edge, eliminating the issues with frays, but not all cable sleeves have this feature.
What Does a Kickdown Cable Do & How Does a Kickdown Cable Work
Kickdown cables control non-electronic automatic transmissions. When the throttle reaches WOT (Wide Open Throttle), the kickdown cable is pulled tight, which pulls a linkage or valve in the transmission, forcing it to downshift to a lower gear. This should only occur at WOT, so the adjustment of a kickdown cable is important when you have changed the carburetor or throttle body (check out the difference between throttle body vs carb. Stock cables do not have adjustable links, instead they use a long-slotted arm that allows the throttle to move freely until WOT. These are not compatible with many throttle arm designs.
Don’t confuse a kickdown cable for a TV (Throttle Valve) cable. Used on GM 2004R and 700R4 automatics, and Ford AOD transmissions, these cables require adjustment. If the TV cable is out of adjustment by even a tiny bit, the transmission may shift too fast and burn up the clutches. This article does not address the fitment and adjustment of TV cables, only kickdown cables.
How to Adjust Kickdown Cable
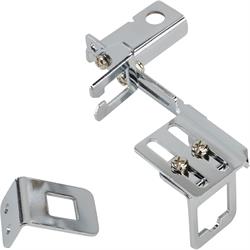
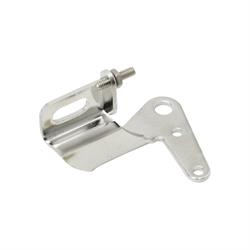
We installed the cables using two different brackets, a throttle bracket and kickdown cable bracket. The first bracket is a Speedway Motors universal throttle cable bracket. This one is designed for factory-style cables which use square lugs to secure the cable. Aftermarket cables typically use threaded fittings, which will work in this type of bracket but are not ideal. Once the installation was completed, we swapped out the Speedway Motors bracket for the Lokar Hi-Tech cable bracket, which looks better as it was designed for the cables we used. We opted to show both brackets, as using the universal bracket is a common choice. The biggest benefit (outside of looks) to the Lokar bracket is the setscrew that stops the bracket from rotating on the single mounting bolt. This is a consistent issue for aftermarket brackets, and the Lokar bracket solves this with one tiny set screw.
Is a Kickdown Cable Necessary
You do not actually NEED a kickdown cable at all, your transmission just won’t downshift when you floor the gas pedal. You will have to select the lower gear yourself manually via the shift lever (shift from 3rd to 2nd for example). While that is certainly fun and all, it gets old fast. A properly adjusted kickdown cable makes the driving experience better.
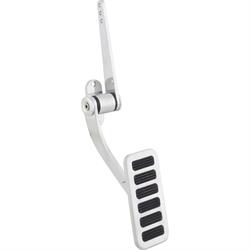
Kickdown Cable & Throttle Cable Installation | Step-by-Step
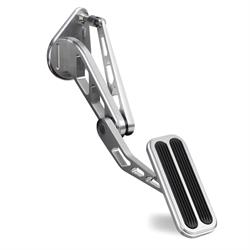
Follow along as we install a throttle pedal designed for cable use, along with a matching kickdown cable using both Speedway Motors and Lokar hardware.