Rebuilding a 4160 Holley Carburetor
Most people look at a carburetor and are intimidated by it. They look at all the screws and linkage wondering what all of this could possibly do. Then when they have issues with their carburetor not working properly, a lot of car hobbyists just remove the carburetor and take it to a shop to have it rebuilt. STOP you don’t have to do that.
How Hard Is It to Rebuild a Carburetor?
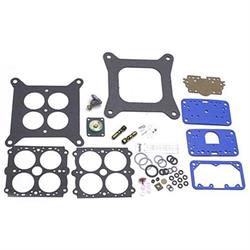
Rebuilding a carburetor or renewing it is not as hard or intimidating as it looks. The key is to take small steps and work on one thing at a time. By using a rebuild kit such as the Holley 37-754 Model 4160 4 Barrel, 750 CFM Rebuild Kit and following the instructions included in the kit, along with this article, we can help take the worry out of it.
First, you will want to start with a clean work surface and plenty of space. Unbox your kit and lay everything out on your work surface. Next, spray your carburetor off with carburetor cleaner or in a parts washer to loosen up and remove and dirt and debris on the outside of your carburetor. This will prevent any dirt from entering your carb when you are reassembling it.
Begin disassembling your carburetor, following the numbered diagram included with P#42737754. Start with number one and work through all the numbers cleaning each part as your remove it.
While you are disassembling the carburetor try to keep it facing the same direction throughout the entire process and make sure to place parts that you remove from the left side of the carburetor set to the left side of you and parts from the right side put to the right side of you. This will help during reassembly to not interchange parts from side to side on accident.
Additionally, while removing the linkage and such, as you remove a pin or clip, reinstall it right away to prevent losing it or forgetting which pin or clip went in that location. The kit does include new pins or clips as needed which you can swap out for the old during reassembly. Finally, before removing any adjustable screw, such as an idle screw, turn it in until it seats, counting your turns as you go. When you reinstall the screw just back it off the same amount of turns that you previously counted, by doing this it will give you a good starting point to tune your carburetor from.
Once everything has been thoroughly cleaned and gone through begin reassembling your carburetor in the reverse steps from which you disassembled it, using the diagram as a guide. After reassembling your carburetor simply reinstall on your engine and fire it up. With a little bit of tuning, you’ll have finished this job that may have seemed intimidating when you began.
What's The Difference Between Holley 4150 And 4160?
The rebuild steps outlined here will work for both the 4160 series carburetors like we have, and the 4150 series carburetors as well. The only difference between the two (given the same CFM rating, jet size, etc.) is that the 4150 uses a full metering block with replaceable jets for the rear two barrels of the four-barrel carburetor, whereas the 4160 uses a fixed metering plate and you have to change the whole plate if you want to adjust the rear metering. You can upgrade your 4160 to a 4150 simply by replacing the metering plate with a metering block kit. Note the Holley metering plate will move the rear fuel bowl rearward and if your fuel log isn't adjustable you will need a 4150 fuel log due to the rear fuel inlet location being moved rearward.