How to Convert Rear Drum Brakes to Disc Brakes (Install & Adjustment)
Are Rear Disc Brakes Worth It?
The advantages of a disc brake on the rear of your car are numerous. A properly sized and set up disc brake will be far less prone to fade. A drum brake is self contained and not known for dissipating heat very well, and many of us have had the experience of attempting a panic stop on hot drum brakes and know that sinking feeling when they've faded into oblivion. Disc brakes are also easier to maintain (no more pesky springs!) and look more trick through the windows of those custom wheels. There's a reason the OE's have been doing it for decades.
Why a Weld-on Caliper Bracket?
When you’re ready for a rear disc brake conversion on your hot rod, muscle car, or classic truck, Speedway Motors has a wide variety of bolt-on rear disc brake kits. But sometimes, your application, personal preference, or budget will dictate that you use a rear disc brake kit with a weld-on caliper bracket.
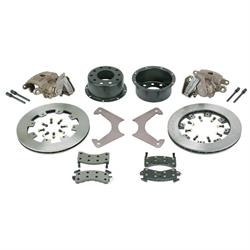
In our case, our 5 on 5” wheel bolt pattern necessitated that we use a universal kit, and we chose our 3-inch Backspace Rear Disc Brake Kit with Emergency Brake. There are plenty of other options depending on the offset, rotor diameter, and caliper style that you prefer.
Mocking-Up the Brake Kit
We began by pre-assembling everything, using non-locking nuts on the provided 3/8 socket head cap screws to secure the hat to the rotor. Save the locking nuts for final assembly. Also note the orientation of the rotor to the hat. Some kits will utilize a slotted or curved-vane rotor that will dictate the rotor’s orientation to the hat as well as what side of the car it ends up on. In the case of this kit, the non-slotted, straight-vane rotor can be oriented either way, and we chose to install the hat to the flat side of the rotor. This will position the caliper inboard by about an inch and potentially offer a little more clearance to our 15” wheels. We then installed the rotor assembly to the axle flange using a couple lug nuts.
This is a good time to remember that you will ultimately be welding the brackets to the housing. It’s essential that you weld to clean metal, so be sure to clean any rust, paint, or grease from the axle housing. We also ground the zinc coating from the brackets.
Next, we assembled the calipers to the brackets. Make sure the bracket is flush against the ears on the caliper. Any space here on either side can cause the caliper and bracket to be installed crooked.
As for orientation, this is another situation where the universal nature of this kit gives you some options. On a non-emergency brake caliper, the caliper can be oriented to the front or back of the axle. Do what offers the most clearance to your suspension components and provides the ideal situation for plumbing the brake lines. Since we chose the kit with emergency brake calipers, we are somewhat constrained to a roughly 45-degree angle to the rear of the axle. This allows the cables to attach at an optimal angle. Remember when it comes time for final assembly that the bleeder needs to be pointed up, therefore determining which caliper goes on which side.
We then slid the caliper and bracket assembly over the rotor, supporting it with a jack stand. This is a great opportunity to double check that this assembly will not interfere with any suspension components or otherwise cause problems when it’s installed. You will be unhappy if you have to cut a welded bracket or two off of the axle. The next few steps are critical to avoiding this ugly situation.
Making sure the piston is fully retracted and with the pads installed, shim both sides evenly to center the caliper over the rotor. Then, double check that the bracket is square with the axle and that the front/rear angle relative to the axle is what you want it to be. We used an angle finder to match one side to the other. When you are absolutely sure that everything is positioned like you want it to be, tack the brackets to the housing.
Welding the Caliper Brackets
It’s hard not to sound preachy here, but it’s very important to remember that these components are responsible for stopping your car. It’s one thing to have a weld fail and lose an exhaust pipe (who hasn’t been there?) but it’s a catastrophic situation when brake components fail. If you are at all uncomfortable with your welding ability or your welding equipment, please take your axle to a certified welder to be welded up.
After removing the calipers and rotors, we were ready to weld. We chose to TIG weld our brackets to the housing, but a MIG will also do the job. Note that if you’re MIG welding, take care not to get any slag on any of the brake components, especially the rotors. We were also careful not to put too much heat into the housing, stopping every inch and a half or so and allowing it to cool. While it’s slightly less critical at the housing ends than it is in the center, it’s still important to remember that welding has a tremendous amount of power to pull, warp, and distort components.
Final Assembly
Once everything was welded, we painted our housing and moved on to final assembly. This included assembly of the rotors to the hats with the provided locking nuts, threadlocker, and torquing to 37 ft. lbs.
Some of you may be wondering about safety wire on these fasteners. If you ask a few different technicians whether or not the bolts that hold the hat to the rotor should be safety wired, you will get answers on both sides of the fence. In this application, we have determined that the supplied all-metal top lock locking nuts (NOT a nylon insert nut) along with some high-temp threadlocker are sufficient. We also plan to inspect these fasteners during routine maintenance once the car is put into service. However, if your application utilizes a threaded insert or threads cut into the rotor that negate the use of the locking nut, then you absolutely must safety wire. Also consider how the car will be used. A race car that will see extremely high brake temps will warrant an extra safety factor.
With all of this being said, if safety wiring will offer you additional peace of mind, Speedway Motors offers a nifty fixture for drilling bolt heads as well as the safety wire and pliers that you will need to complete the job. We also recommend picking up a few extra 1/16” drill bits; hardened bolts are hard to drill. If you wish to skip this drama, ARP offers bolts that are pre-drilled.
With the rotors assembled and installed, we installed the calipers to the brackets for the last time. Don’t forget to use some grease on the slide bolts. Since we’ve been pretty handsy with these components during mockup and installation, we cleaned the rotors with brake cleaner to remove any grease or oil from our skin.
We will be waiting to plumb the calipers and install the emergency brake cables until after the axle is installed in the car. When you get to this point, note that these floating calipers will move and therefore REQUIRE a flex hose between the hard brake lines and the caliper. Fixed calipers stay put and can be plumbed with hardline, but you absolutely must have a flexible connection with these floating calipers.
Hooking up the emergency brake cables is pretty straightforward, and we recommend doing this before you attempt to bleed the brakes. With this style of caliper, it’s critical that you are able to ratchet the piston out before bleeding. Trust us, you will regret not doing so as the calipers are very difficult to bleed with the pistons fully retracted.
Final Thoughts
It’s worth noting that this process will be different for a fixed caliper. Sliding calipers like we used here are pretty forgiving, but fixed calipers require that they be precisely centered. That process will look a little different than what we did here.
Also keep in mind that disc brakes often require a different bore size on the master cylinder, an upgraded or adjustable proportioning valve, and a 2lb. residual pressure valve if your car is so equipped. Be sure to consider your whole brake system when upgrading or changing any component.