What You Need to Know About Brake and Fuel Line Flaring and The Tools Required
Quality Tools and a Bit of Practice Will Make You A Pro
When it comes to brake and fuel system servicing on your daily driver, rarely does changing a fuel filter or brake caliper require fabricating a new fuel or brake line. Yes, it can happen, but it is rare. Now, on the other hand, when you are building a street rod or kit car or say upgrading the antiquated drum brake system on a classic muscle car, you will in fact be looking at creating custom bent and terminated hard lines for your brake and fuel systems. Obviously, with the myriad of combinations of front and rear brake packages, fuel tank locations, frame types, and more, you will never find a pre-made hard line that will work, so it is up to you to create the exact hard line for your needs. To do that you will need to correct tools to make the job happen and a little bit of practice to get the whole bending and flaring process down to an art.
Should I use a 37- or 45-degree flare?
Both style of flares will get the job done, let us just start there, as it is not a matter of which flare holds more pressure. When you get right down to the matter it is mainly personal preference and experience. The 37-degree flare is a single flare process that requires a tube sleeve to support the back side of the flare and is secured via a female threaded tube nut. The 37-degree spec came about via our U.S. military in WWII as a joint effort between the Army and Navy, hence the “AN” designation for the fittings and line used with this flare type.
The 45-degree inverted flare is an SAE (Society of Automotive Engineers) standard. Not only is the angle of the flare seat different, but the flare is created in a two-step process, creating a double walled flare seat. The 45-degree flare utilizes an inverted flare fitting. This is often shortened to “IFF” when shopping for fittings and features external, or male threads on the fitting. A tube sleeve or any sort of flare seat support is not required due to the extra wall thickness of the double flare that this style uses. The 45-degree inverted flare is the most common style of flare used in automotive hard lines like brake, fuel, and transmission fluid transfer.
As we stated above, it really comes down to personal preference and experience. We will say the 45-degree inverted flare is more common with stock components, so if you are restoring a vehicle and using stock brake components, mechanical fuel pump, etc. expect to use 45-degree flaring tools. On the other hand, if you are planning high-performance braking components, high-pressure EFI-compatible fuel lines, and other aftermarket pieces that generally use AN fittings, then be prepared to hit the ground running with a quality 37-degree flaring tool.
Speedy Tip: The 37-degree AN flare fittings do have a more polished or finished look to them due to their internal female threads and that you can often purchase the tube sleeves and nuts in colors for a little splash of style against your frame or firewall to compliment a nice shiny stainless steel hard line.
While not within the scope of this buyer’s guide, we will briefly touch on metric or “bubble flare” brake line flares. You will usually only run into these on more modern cars, especially European models, but they are out there. You can find flaring tools that will create the metric bubble flare, but for the extremely limited applications a typical rodder or racer might see, you can easily get away with an adapter fitting to convert the metric bubble flare to your standard 45-degree inverted flare or 37-degree AN flare,
What Tools Will I Need to Flare a Brake or Fuel Line?
While we are obviously going to get into the tools necessary to flare brake and fuel hard lines, we want to take a step back and bring your attention to a few tools that really help prepare your hard lines for flaring. Flaring is technically the last step in building a custom line for a fluid transfer project, so what is the first? Cutting the line of course! Starting with a bulk roll of line or even a our standard sticks of 3/16 brake line, you need to cut the raw hard line to length and for that we recommend a tubing cutter. The tubing cutter creates a clean cut that is easily chamfered with the tool’s built in chamfer blade. Using a hacksaw or cutting wheel creates filings/debris that can be left behind and damage sensitive fluid systems like fuel injectors or carburetor needle and seat assemblies. Oh, and if you are using bulk line rolls, like what comes in our universal 3/16-inch brake line kit, be sure to pick up one of our handheld tubing straighteners. They make easy work of straightening that coil of brake line tubing!
Speedy Tip: Use some stiff electrical wire, coat hangers, welding rods, or other such material to make a template for your line routing. This will aid in determining how long your line needs to be to make that cut.
Once you have your line cut to length, your next hurdle is bending the line to match your template, and for that you will need a tube bender. Speedway offers several bending tools, including a dedicated 3/16-inch brake line bender, along with other bending tools/pliers for other line sizes suitable for transmission cooler, fuel line, and more. We also have this great video with several tips on fluid line bending, creating templates, and more. With your fluid line cut to the proper length and bent up to your routing satisfaction, you can now get down to the task of flaring the ends for installation of the line.
Which leads us to the brake line flare tool itself. You will find Speedway offers several 37-degree flare tool options and the more common 45-degree flare tool for just about any budget. Most can be mounted in a vice to aid in stability during use and we even offer a pair of “on car” flaring tools for 45-degree flaring needs for repairing original lines or working in tight spaces. Like most tools, we suggest buying the best brake line flaring tool and it will last you a lifetime. The 45-degree double flare tool will obviously see the most use, as it can be used for repairs on all sorts of vehicles, but if you are even remotely considering AN brake hoses or a fuel system with AN fittings, grab that 37-degree flare tool kit as well, so it is always at the ready in your toolbox drawer.
How do I flare a brake or Fuel line?
Alright, you have your line cut to length and bent to your template/routing. It is time to take a deep breath, exhale slowly, and get to flaring those line ends. Where to start in your quest to learn how to flare brake line? First things first, place the inverted flare fitting (45-degree flare) or tube nut and tube sleeve (37-degree flare) over the cut and finished end of your line in the proper direction. What we are trying to do here is prevent you from making the biggest mistake in brake and fuel line flaring projects—making a perfect flare and then realizing you left the fitting off the end of the line. We have all done it, but you do not have to if you take a minute and plan and are organized. Trust us, there is no worse feeling than admiring your new, perfect flare, and then spotting the tube nut or flare fitting sitting on the bench in front of you! Do not be that person!
Speedy Tip: The 3/16 brake line used for brake lines normally comes with a 3/8-24 inverted flare fittings. If the master cylinder, proportioning valve, or other hardware requires a different size fitting, do not use an adapter, simply install the correct size fitting when building the line. You can find all manner of brake line fittings to build your lines on the Speedway Motors website.
With your line fittings in place, you can proceed to insert the hard line into the correctly sized opening in the clamping bar of your tool of choice, set the line depth according to the tool’s instructions, and secure the line. Then, depending upon whether you are performing a 37-degree flare or a 45-degree inverted flare, you will use the tool’s forcing cone to make a single flare directly into the end of the hard line, or you will use the forcing cone double flaring adapter to the first step of your double flare. If you are creating a 37-degree flare you are done and can remove the line from the tool. For a 45-degree inverted flare you back off the forcing cone, remove the double flaring adapter, and then tighten the forcing cone a second time to fold the line down on itself to create the second, or double flare. We covered these steps in greater detail in a past Toolbox article as well.
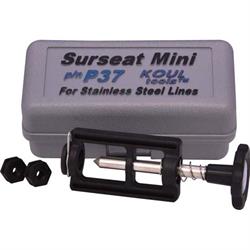
The quality of the flare is usually directly proportional to the quality of the tool and the person using it. When at all possible, use a sturdy bench mounted vise to secure the flaring tool. This not only frees up both of your hands, but the immobility of the tool itself versus it flailing around in your hands greatly aids in a quality flare. When flaring add a drop of brake fluid or machine oil to the forcing cone (and adapter if doing 45-degree flares) to reduce friction forces, making the job go more smoothly. Lastly, use a flare cone lapping tool, such as the Koul Tools Sure Seat Lapping Tool, to dress the flare seat for a leak-free installation.
So, if you are ready to start flaring some hard line on your project grab the proper tools, some scrap hard line, and go practice a few cuts, bends, and flares until you feel comfortable doing the job and you will have your brake, fuel, transmission, and other fluid lines plumbed in no time!