AN Fittings Install | How to Connect AN Fittings & Cut Braided Hose
How to Install AN Fittings
For those of us used to the old-school world of hose clamps and pipe threads, AN fittings and plumbing might seem a little intimidating at first. In fact, AN fittings were designed by the armed forces to be easy to service at scale, so they’re really pretty simple. Here’s a quick primer to get you started on how to install AN fittings.
Step 1: How to Cut Steel Braided Hose
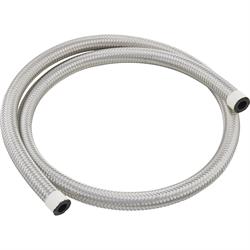
This one comes up often. Hose with that tough layer of stainless braid on the outside is designed to be extremely resistant to cutting and abrasion. While this durability is great once it’s plumbed up in the car, cutting it to length and installing the fitting can be tricky and the frayed wire ends are infamous for drawing lots of blood. Here are some tricks to avoid sloppy cuts and a frayed wire mess.
There are really two ways to cut braided hose line. Braided hose cutters that resemble large bolt cutters can be used to slice through the hose. Be cautious though as not all hose cutters are designed to cut braided stainless hose. Perhaps most common is the use of an abrasive cutoff wheel in a saw or on a grinder. Be sure to wrap the area to be cut with electrical tape first, then make sure your cut is clean and square. The real downside to this method is that the abrasive cutting causes bits of rubber and stainless to accumulate inside the hose and if left there, this gunk can make its way into pumps, engines, and fuel injectors. This can be largely cleared by blowing compressed air through the hose, but take care to blow in from the opposite end of the hose from the one you just cut to blow the gunk out, not back into the hose. Also, while the cutting of braided hose is the most commonly discussed topic, it’s also important to carefully cut push-on hose as well. Hose cutters typically work best for non-braided rubber hose. Most critically, the cuts need to be square so the end of the hose is flush where it meets the ferrule on the fitting. Crooked or sloppy cuts can leak and at the very least look shabby.
Step 2: How to Install AN Fittings
“Install” in the case of AN fittings can mean several things. Here are some guidelines for assembling regular hose ends and push-on fittings as well as tightening and clocking the fittings into the system.
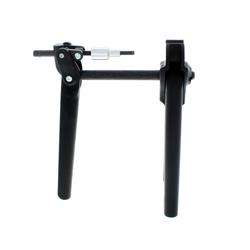
First, let’s talk about how to install AN fittings on braided hose like the one we cut in the last step. Whether angled or straight, these fittings will have a threaded socket that installs on the outside of the hose and male side that includes male threads and the part that fits inside the hose. As the outer nut is tightened over the male barb inside the hose, the assembly is swaged together, creating a leak free seal. This is the part where you often find your hands cut up by the frayed stainless braid. Careful cutting as described above will help, but even the cleanest cut will leave some frayed wire. An AN Fitting Install Tool will help immensely and lead to a better result. As for how to install AN fittings on nylon braided hose, the same procedure described above can be used, though hose without that tough stainless braid will be much easier to cut with hose cutters and may not require that you break out the cutoff wheel.
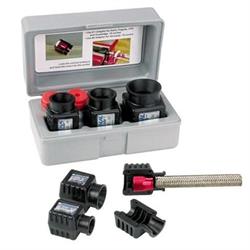
Push on hose is much simpler, but can be a wrestling match if you do it wrong. First, always use assembly oil on the fitting before trying to slide the hose over the barb. Next, you have two choices; you can either try to manually push the fitting into the hose, which is sometimes a must if you’re building a system in the car. However, just trying to freehand push on a fitting as you would an old school barbed fitting and rubber hose is difficult and not recommended. Not only do you almost always fail to get the hose fully seated against the ferrule (as it should be) but you also can damage the hose as you bend and twist it trying to get it assembled. In a pinch, we have rolled a bench with a vice and soft jaws next to the car to hold the fitting. Ideally, the hose will be assembled separately from the car, and a push on hose tool can be used to easily and completely seat the fitting. Just beware to properly clock any angled fittings as they will not spin inside the hose once assembled.
AN fittings were designed to be universal, so the processes described here are true of how to install 6AN fittings for a fuel system using a 6AN fittings kit as well as installing a -16 hose and fitting on a dry sump tank. It also doesn’t matter whether you’re using blue AN fittings or black, these are just cosmetic decisions and both use the same 37-degree flare to seal.
There is a torque spec for AN fittings that varies by fitting size and material, but more often than not your fittings and hoses will be in the way of a socket and torque wrench. If we’re being honest, we find that we usually simply tighten our AN fittings to what seems appropriate using a dedicated AN wrench to avoid damaging the hex on the fitting. AN fittings are fairly forgiving and usually provide a leak free seal when sufficiently tightened. However, if you want a way to more precisely quantify the tightness of your fittings without a torque wrench, you can get close by tightening the female fitting a quarter turn, or 1 ½ flats past finger tight.
AN Fitting Leaking at Swivel
Even the best mechanics often find a leak or two the first time a freshly plumbed system is pressurized. More often than not, the cause of the leak is a fitting that was not sufficiently tightened on assembly and a turn to the female part of the fitting will solve it. If the leak persists, then it’s time to investigate further. The cause can be an improperly assembled or damaged hose end or damaged threads. AN fitting threads, especially those on aluminum fittings, can be damaged by over-tightening. Also check the other parts of the assembly, such as the pipe thread or O-ring on an adapter fitting. Always remember to bleed the pressure from any fluid system before you start disassembling fittings for inspection.
Do AN Fittings Need Sealant
It’s commonly asked how to connect AN fittings. For example, do AN fittings need teflon tape or other thread sealer? Do AN fittings need O-rings? The answer to both of these questions is no; don’t put any sealant on the tapered part of an AN fitting. So how do AN fittings seal without any additional sealer? That 37-degree taper is a precisely machined part that is designed to seal high pressures without the aid of any additional sealer or O-rings. In fact, adding teflon tape or other thread sealer will almost certainly cause a leak. If you don’t believe it, the next time you’re on a commercial airliner and they drop the flaps approaching the runway, take a look inside the wing. You’ll see a bunch of lines plumbed with AN fittings. If they’re good enough to go 500 mph at 30,000 feet, they’re good enough for your old car. Remember however that you will need some kind of thread sealer on any AN adapters that use pipe threads to adapt AN plumbing into a casting or billet part. There are also AN adapters that use O-rings to seal the other side and a properly lubricated O-ring in good condition is a must for these fittings. Just don’t try to put one on the side with the taper.