The Exhausting Search for Headers
One of the most common Tech calls we get starts off as, "I need headers for such and such vehicle, what will fit it?" Searching for the year, make and model of specific headers can be quite difficult. Even if the manufacturer states that that header will fit your specific car and engine combination you may end up with having to modify something to get them to fit properly. It could be that the car was converted to power steering and the steering box is in the way. Or just the fact that you are dealing with an old car and the frame may not be as straight as it once was.
Manufacturing for vehicles is leaps and bounds away from where it was fifty plus years ago. It just might be that there was a miss-alignment of the frame right from the start. A lot of times if your headers are oh so close, you can get away with shims under the block side engine mount. Such as Speedway's Motor Mount Shims, part number 7204125 for Small Block Chevy. Or sometimes if looks are not a factor to you, a nice tap with a ball peen hammer on the primary tube will dimple a pipe enough for clearance. Maybe even replacing engine mounts themselves would help if yours are worn out or an upgrade to new polyurethane engine mounts could help. Before giving up and returning the headers try and see if you can make them work.
As for the car I'm building, here's the process I followed and the problems that I ran into. To start, I had swapped the straight six from my 1954 BelAir for a 454 Big Block Chevy and TH 400 transmission. I had spent hours surfing the internet looking for any type of header that could fit my application. Long tube, mid-length or shorty didn’t really matter to me, I just wanted a header to fit that wouldn’t break the bank. Sure I could find a pair that would fit if money wasn't an issue. I would just have a custom header made for the vehicle. However, if you are anything like me this build is on a budget.
On my car I was dealing with the stock front suspension still under the car, along with the stock steering box. The steering box sits on top of the driver’s side frame and the pitman arm extends straight down right underneath the third primary tube from the front of the motor. It was extremely close to the exhaust ports on the big ole Chevy heads.
Now the passenger side of the car was a different story as I had all kinds of room to spare. I had new V8 frame mounts and a standard 3 bolt Chevy rubber engine mount in place. After measuring and comparing different types of headers, the ones I tried first were from Hedman Headers listing for a 1995 Chevy 3500 truck with a 454.
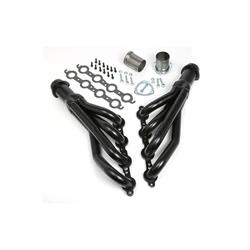
These are 1 3/4" primary and 3" collector long tube header, which was my first preference. It was easier to build the rest of the exhaust off the collector. Once I had them I knew they wouldn’t slip right in. Before even attempting to fit the headers I wrapped them in blue painters tape. That way if they did not fit I had less of a chance of scratching or marring them if I needed to return them. I would advise to take the time to do this as it will save a lot of headaches dealing with a return.
With the front end of the car securely up on jack stands, I wheeled my cherry picker (engine hoist) in and lifted the engine up a little. While working from under the car the passenger’s side almost slid right in, but the original frame began to give me problems. There is a brace that runs from just behind the front cross member to the transmission cross member by the tail shaft of the transmission. This was right where the collector wanted to go.
The thought crossed my mind to start cutting that section out, but before I went crazy I moved to the driver’s side. If I couldn’t get that one close I wasn’t going to start chopping things up just yet. I then tried getting the driver’s side in from underneath the car and immediately hit the pitman arm. By raising the engine up more with the hoist I was able to clear the pitman arm, however not when lowering it back down. The second primary tube would run right into the steering box, which were close, but would require a lot more modification than I was willing to do to get them to work. So I stripped the tape off and returned them.
On a whim I ended up finding a pair of Stainless Steel mid-length headers that fit my budget. These were for 60 to 70's a body Chevy car, 1 3/4" primary tube and 3" Collector. They included reducers, hardware and all the gaskets. So, for $200 I thought I'd give them a shot. The pictures looked similar to what I needed and the only way for me to tell if they would work was to “buy em and try em". With the bigger primary tubes I knew clearance would be an issue on the driver’s side.
Next, I decided to make my own shims for the motor mounts to gain a little room. By using an old stock pair of steel clam shell motor mounts I was able to cut just the back section off, leaving the 3 bolt pattern and a flat triangle shape shim. Cost: Zero dollars, it doesn't get much better than that. I also removed the frame brace running to the transmission cross member. The new transmission cross member I installed has an upper hoop and lower bolt on plate, while the original was just flat under the transmission. With the upper hoop I thought I'd have enough strength to remove the brace from the frame. It was also an option to fabricate a different brace if needed once the exhaust was run. Well, even with these modifications I was unsuccessful with installation on the driver’s side, but the passenger’s side was no problem. Back to the drawing board I went.
I then realized that I could just run a stock cast iron exhaust manifold that exits toward the rear. They are cost friendly, readily available and would give me the clearance I need for the steering box on my car. I also have a 400 horsepower 454 in a 54 Chevy Belair 4 door with small back tires. I don't think I am going to miss horsepower loss from a stock exhaust manifold. The one I chose are stock replacement for 1996-2000 Chevy 3500 with a 454/7.4. At $60 a piece it was a no brainer for me. Also, breaking in a new engine with cast iron manifolds is recommended. During break in the engine could potentially run excessively hot and damage a coated or painted header. Not to mention this year of manifold has a threaded boss in the collector for an O2 sensor, which I would need if I decided to do a fuel injection swap in the future.
After receiving the manifolds I sourced a plug for the O2 sensor at the local hardware store. All I had to do was raise the engine with my hoist, set them in place and bolt them up, then lower the engine back down. Presto bingo, they fit! The driver’s side does exit very close to the frame rail, but there was enough room to get a down pipe attached.
At that time, I bolted up some flex pipe extensions about 24" long to run the engine. Remember to never run an engine with just a stock exhaust manifold. This is one sure way to burn up valves and throw flames right into the engine bay creating a dangerous situation.
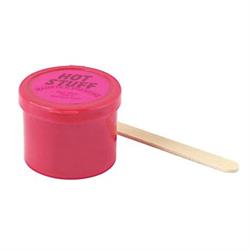
Speedway Motors also sells a coating for cast iron that brushes on called Hot Stuff Exhaust Manifold Dressing, part number 91044079. This can be used on virtually anything that is cast iron. Just hit the surface with a wire brush and wipe it on with a rag or brush it on. I also use this to dress up my cast iron master cylinder.
Just remember not everything will bolt right on or work every time. They call this Hot Rodding for a reason. Sometimes you have to be realistic and say to yourself 'Do I really need that?' If you decide that you do, then you may have to modify, fabricate or build something to work with your car.